
20061008
Build a Model Sailboat !!
The information used for the " Model Sail Boat Building, Making A Wooden Star45 R/C Sailing Model" includes posts found on the companion blog: The Star 45 R/C Model Sail Boat - Builders Journal
"Model Sail Boat Building, Making A Wooden Star45 R/C Sailing Model" is a start to finish, step by step, building manual. Including directions for covering a wooden star with fiberglass.
With the popularity of radio-controlled models, the number of people interested in owning a model yacht has also grown - in geometric range. As with model aircraft, the choice of sailing models runs the gamut from child's toy to sophisticated craft.
Over the past 30 years I have fielded many questions regarding the choices and considerations which go into selecting a radio-controlled sailboat.
Four questions are asked over and over by prospective skippers: How do the radio-controls work? How much do they cost? What do I look for when I buy mine? And, where can I get plans and instructions for building a sailing model?
The modern R/C model sailing craft is as different from a toy boat as a museum display model is from a child's tinker-toy creation. A model sailing craft operates with the same sophistication of design as any full-sized yacht
The AMYA STAR 45 Class discussion group is a terrific place to exchange ideas and talk about building Star 45 models for racing in AMYA regattas.
Feel free to contact me, Dave Mainwaring mainwaring @ rcn.com
What is a hull ? and construction categories
Dave Mainwaring's definitions
HULL defintion of:
The outer shell, including frames, ribs, interior bulkheads, exclusive of masts, rigging, deck and equipment.
"bare hull" defintion of:
A model boat's outer shell, EXCLUDING, ribs, interior bulkheads, exclusive of masts, rigging, deck and equipment. Example. A fiberglass hull as pulled from a mold.
--
A wooden hull:
one constructed of wood (including plywood).
--
--
HULL defintion of:
The outer shell, including frames, ribs, interior bulkheads, exclusive of masts, rigging, deck and equipment.

"bare hull" defintion of:
A model boat's outer shell, EXCLUDING, ribs, interior bulkheads, exclusive of masts, rigging, deck and equipment. Example. A fiberglass hull as pulled from a mold.
--
A wooden hull:
one constructed of wood (including plywood).

A glass hull:
one constructed of reinforced plastic (cloth impregnated with resin). Nominally referred to as a fiberglass hull.
one constructed of reinforced plastic (cloth impregnated with resin). Nominally referred to as a fiberglass hull.
--
A composite hull:
a hull constructed of wood and covered with reinforced plastic (cloth impregnated with resin).
 OR:
OR:
a hull constructed using a laminate (sandwich) consisting of reinforced plastic (cloth impregnated with resin) on two sides of a core . Core materials may be foam or wood.
a hull constructed of wood and covered with reinforced plastic (cloth impregnated with resin).
 OR:
OR:a hull constructed using a laminate (sandwich) consisting of reinforced plastic (cloth impregnated with resin) on two sides of a core . Core materials may be foam or wood.
Builders to do list,
Order Star 45 construction drawing from AMYA store
Buy or borrow books on boat building. Join the Star45 discussion forum.
Decide on type of planking and wood to be used to build the model.
Set aside a work space for building.
Review the bill of materials need to build the model and buy the materials.
Order deck and mast fittings.
Order mast (if you are buying the mast) and order sails (or sail material).
Choose the radio system, buy a sail control unit, Order keel bulb.
While the hull is under construction build:
Keel fin and ballast bulb
Rudder assembly
Make or assemble spars ( mast and booms)
Build cradel to hold boat under construction and when finished.
Test Radio System and sail control unit
After hull is planked:
Install keel trunk or provisions for mounting keel.
Install radio and sail control unit, Then remove while construction continues.
Contstruct deck and hatches
Install/mount deck fittings
Test access to radio and sail control inside the hull.
Provide a exit guide for radio antenna so it can be attached to mast or stays.
Install power switch for turning off batteries
Test mount keel
Paint hull, rudder and keel
Assemble hull, rudder and keel
Set up mast and boom.
Install radio controls.
Check running rigging.
Attach Sails
dry sail model
--
Sail
Display
Storage
Sailing Model, AMYA Star45 Class | building board
"John Fisher" is building Star 45's. He has provided a series of photographs taken as he builds the model from scratch.
These are posted to the blog along with his notes to help builders assemble the Star 45.
In the following posts you will find comments, notes. and his photographs
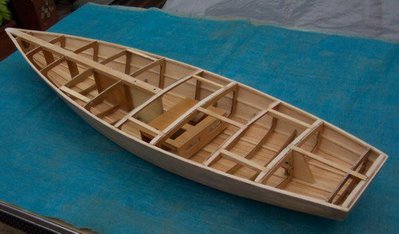
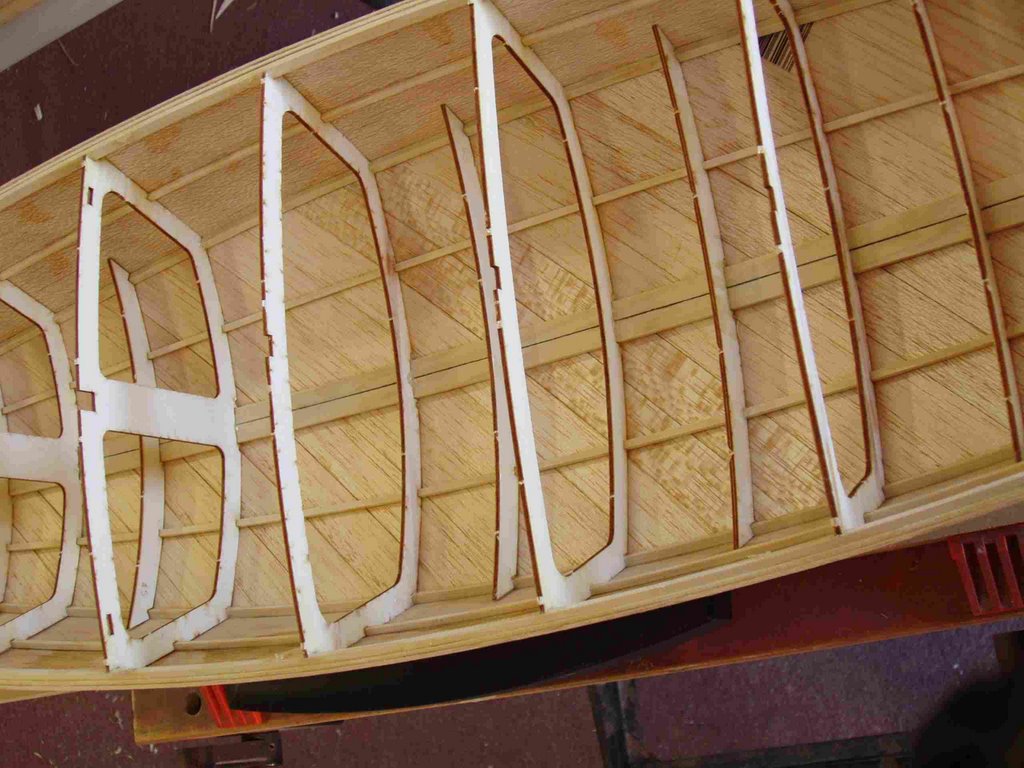
Photo's showing the building board and the first couple of steps for putting the frames together.
Building board is 3" wide 3/4" MDF that is glued/screwed together.
The notched balsa template is glued to the building board using a straight edge. Use a staight edge to make sure it stays straight.
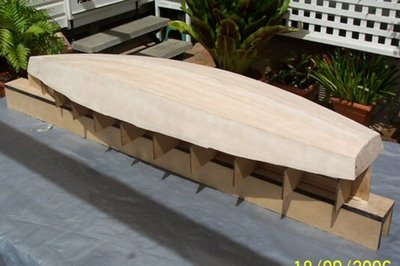
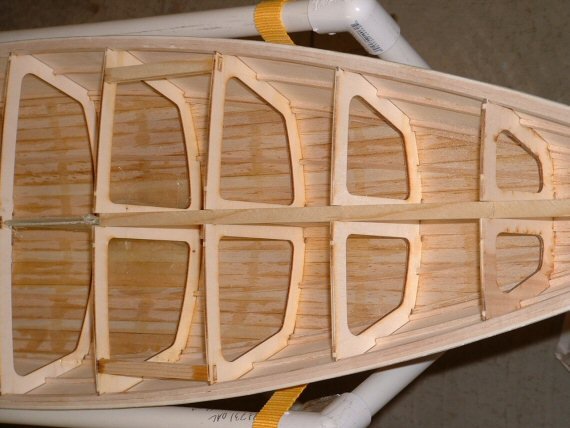
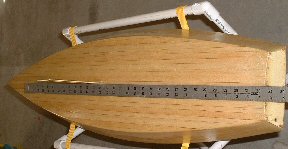
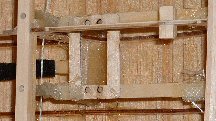
S45 Construction: a cradle for the hull of wooden Star 45
From Star45 Yahoo Group - Message:
New use for John's Lasercut Frames-"Cradle Making":
Phil Geren needed a cradle for the hull of my woodie Star 45 under construction, to hold the hull while he fair the gunnels to the frames in preparation for installation of the deck and while designing and installing the controls (keel is not on yet).
Well, the easiest way to make a perfect cradle is by using the holes (which are left in the John Fisher lasercut frame sheets after removal of the lasercut frames, to trace the exact shapes of the outsides of frames 2, 4, 6, 8, and 10 onto 3/8' thick plywood. Allow for the thickness of planking and carpeting by drawing a second trace for each frame so that the hole for the hull is 3/8' bigger everywhere than the frame.
Then cut out each second trace as the inside of a frame for a cradle. Mount the cradle frames on a 2'X4' piece of particle board, using the spacing of the balsa template included in the frames kit, and using a try square to get them vertical, and making sure that they are all on the same longitudinal center and all parallel.
Then hot glue 1' wide strips of carpeting to the insides of the cradle frames. Voila! A perfect hull cradle.
Best,
Phil Geren"


Star45 : Message: The Perfect Cradle: "
Here are the hull cradle fotos I promised you.
Your shadow invention is so useful. The holes left in the plywood sheets after punching out the frames were used as templates to draw perfect frames for a cradle to hold the hull for completion of the construction (before keel installation).
Thanks so much!
Best regards,
Phil Geren"
Sailing Model, AMYA Star45 Class | Rudder
AMYA Star 45 Class Rules, 2006, Rudder
6.1 Rudders may be constructed of wood, fiberglass, plastic, plastic laminates or metal. The exact shape is not specified, but they may not exceed 4 1/2 inches at the hull (fore and aft) 3 inches at the bottom, (fore and aft); and may not project more than 7 inches below the hull when measured at the post..
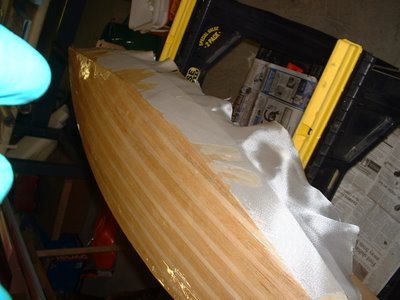
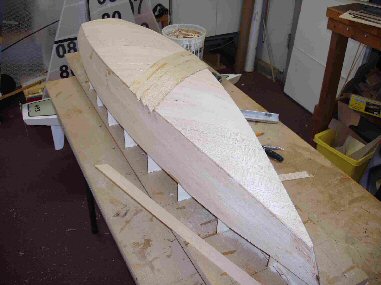
Star 45 Construction Planking with edge glueing
[Star45] Update on planking bottom with edge glueing.
John Fisher is ready { 4/19/2007 } to glass his latest boat and is sharing how he planked it. His dad built a ply sided, cedar planked star using titebond II and it came out pretty light and stiff. With this information I started to build another hull using the same materials. He felt that edge gluing the planks added a lot of the strength to his boat. John didn't want to glue in extra wood to hold the pins to keep the planks in place for the glue to dry, so I combined two methods of planking. John liked the quickness of planking with CA and kicker, but it lacked stiffness when sanding the bottom before glassing. So he decided to edge glue the planks and then tack them in place to the frames with CA.
In this photo you can see where John put drops of CA on the planks. The wood is slightly darker.

It worked well. John has an edge glued bottom and he was able to plank it in one evening. To do this John first spray the frames with kicker, then apply titebond III to the edge of the planks. He then would hold the plank in place, tight against the previous plank, and apply a drop of CA to each frame to hold it in place. It did not matter where John started, bow, stern, or middle, but do make sure the CA has set up before moving to the next frame. Once the whole plank was in place he came back and wiped off the extra titebond. To fair the bottom to the sides he used a $10, 6" plane from home depot set at .010" depth of cut. It quickly removed the cedar and a little sanding finished the job.
John had one plank that was too thin that he had to remove, it was harder than expected. He had the use quite a bit of force to break the glue joint at each frame, so he is confident that this method is strong. John will also use this for balsa planked bottoms.
In photo # 10 you can see the stern still needs to be trimmed and sanded. John will probably use a saw to trim in close and then sand to fair it.

S45 Construction | hull: double diagonal planking
From: "John Fisher"
Here are some photo's of Sherwood Jones Star 45 with double diagonal bottom planking. He used two layers of 1/16 planking. The planks are 1" wide. He then covered it with 1 ½oz glass. Weight is about the same as mine with the 1/16 longitudinal planks and two layers of 3.2 oz glass. Just goes to show that there are multiple ways to solve a problem.
John

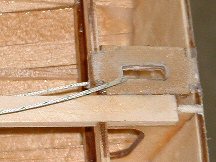
Sailing Model, AMYA Star45 Class | interior work, radio, sail controls, servos, mast support
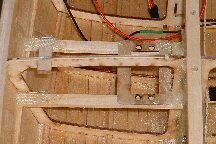
Radio Board stringers between bulkheads
(Note the method of keel support using these stringers)
Radio Board
Rudder Servo
Mast support (inside hull)
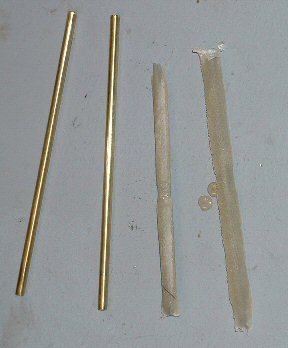
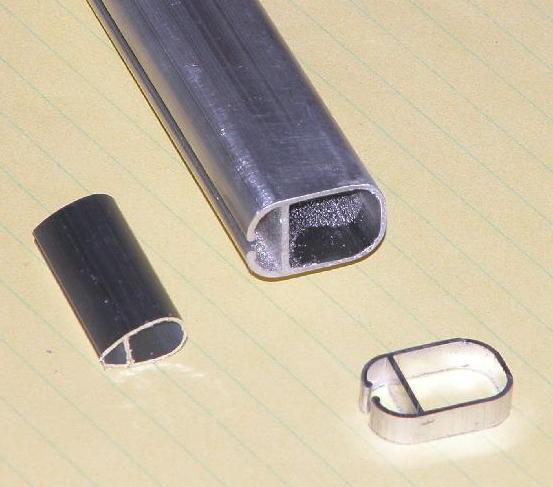
S45 Construction | John Fisher -- keel tubes
Photo sequence showing how John Fisher made his keel tubes. He was mounting a keel from CPM (David Ramos) with longer keel bolts so they will go through the deck when finished. He coated the brass rod with carnuba wax as a mold release.
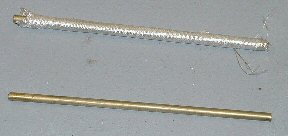


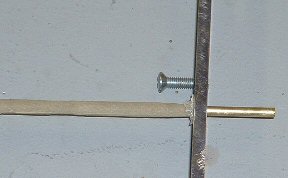


| To align the keel tubes John drills the holes in the center of the boat, this is easy to find since it is simply the middle of the king plank and the middle of the two keel planks. Then to align them so they are straight he placed a metal ruler along the two keel bolts or if a flat plate along the plate. Then look at where the end meets the transom. It should be off center by half the amount as the bolts/keel are thick. John does this on both sides to make sure it is centered. Once the bottom is aligned he tacks it in place with CA, then verify the alignment at the deck the same way. |


Star 45 Keel fins building options, Star45
{Rule7.2}
Keel fins may be solid or hollow and constructed of reinforced plastic, plastic laminates, fiberglass, wood or metal. (Note: Strength and integrity of the keel fins must be maintained whether built solid or hollow.) Keel fin shape is not specified but must follow the general shapes outlined on the reference drawing. However, keels will not be less than 6 inches nor more than 8 inches long (Fore and Aft) at the keel/hull junction, nor less than 4 inches nor more than 6 inches long (Fore and Aft) at the keel/ballast bulb junction.
--
The Mainwaring Keel shape is a fine choice!
--
John Fisher suggests:
The quickest and easiest way to make them if you have access to a metal band saw is to draw the keel in CAD, then print it out. Glue that to a sheet of 3/32 aluminum with 3m77 and cut it to shape.
You could also do the same thing with sheets of plywood and layer it to achive a airfoil shape. Each layer should be smaller than the last and then sand to blend the layers. Could also make a good cad project.
Another way is to cut the shape in two pcs of 1/16 ply, then tape the edges together. Insert a couple of threaded rods between the two sheets for attachment. Then fill with epoxy and microballoons. Using this method you should also glass the outside for additional stiffness. There are photo's of making a rudder like this on the blog site.
--
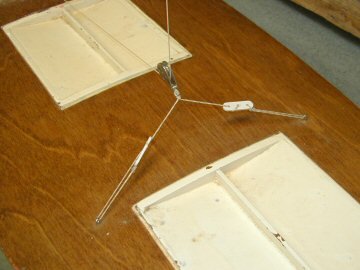
S45 Model Boat construction | Sail Control Units
installing the radio tray for an under deck winch, jib tweaker, and rudder servo. From John Fisher:

The radio tray is 1/16 ply backed up with 1/8 X 3/8 spruce or basswood. Note the glassing at the ends. This adds a lot of strength to the joint and John highly recommend adding it. John uses 1" wide glass tape cut in half, then sprayed with 3M77 so it will stay in place for gluing. Then a dab of your favorite epoxy and you are done.
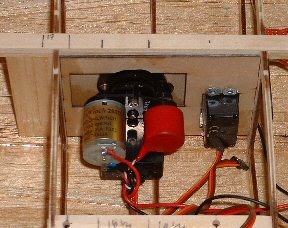
sheet through deck mount.

jib tweaker turn around. The part is a 180 deg sheet lead from great basin.
See also http://woodstar45.blogspot.com/2006/10/blog-post_116031550255831231.html
--
From: David Ramos To: Star45@yahoogroups.com
Sent: Fri, 14 Nov 2008 10:23 am
The following photos show my set up for a drum servo and jib tweaker.
--
Note:
One major advantage of building from a fiberglass hull is the open space inside the hull. David Ramos offers workmanship second to none.
Dave Mainwaring
--
http://www.rcyachts.com/STAR45/P1010084.JPG

http://www.rcyachts.com/STAR45/P1010082.JPG

Main sheet is 2:1 and jib sheet is 1:1
Hope this helps
David Ramos
Chesapeake Performance Models
227 Main Street
Stevensville, MD 21666
david@rcyachts.com
www.rcyachts.com
The radio tray is 1/16 ply backed up with 1/8 X 3/8 spruce or basswood. Note the glassing at the ends. This adds a lot of strength to the joint and John highly recommend adding it. John uses 1" wide glass tape cut in half, then sprayed with 3M77 so it will stay in place for gluing. Then a dab of your favorite epoxy and you are done.


sheet through deck mount.
jib tweaker turn around. The part is a 180 deg sheet lead from great basin.

See also http://woodstar45.blogspot.com/2006/10/blog-post_116031550255831231.html
--
From: David Ramos To: Star45@yahoogroups.com
Sent: Fri, 14 Nov 2008 10:23 am
The following photos show my set up for a drum servo and jib tweaker.
--
Note:
One major advantage of building from a fiberglass hull is the open space inside the hull. David Ramos offers workmanship second to none.
Dave Mainwaring
--
http://www.rcyachts.com/STAR45/P1010084.JPG

http://www.rcyachts.com/STAR45/P1010082.JPG

Main sheet is 2:1 and jib sheet is 1:1
Hope this helps
David Ramos
Chesapeake Performance Models
227 Main Street
Stevensville, MD 21666
david@rcyachts.com
www.rcyachts.com
A Drum style model sail winch
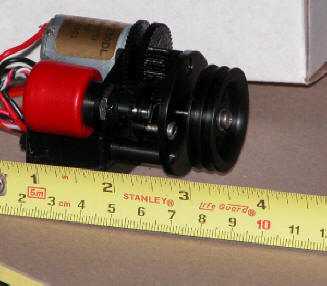
photo's courtesy of "Larry Ludwig" at www.LudwigRCYachts.com, Ludwig Mfg.
==
From: "Stephen Pratt" :
"On the North Coast (Ohio), are using HiTec HS-725 or HS-785 Winches. Bob Luther developed a mechanism to work an endless loop system of sail control. Fits inside the Star 45 with plenty room to spare."

Sailing Model, AMYA Star45 Class | Masts
3.1 Masts shall be made of wood or aluminum. Swing rigs, rotating and permanently bent masts are prohibited.
3.2 Masts shall not exceed 3/4 inches square when measured at the thickest point of the mast. Maximum mast height shall be 70" when measured from the deck, inclusive of the crane. Rotating wind indicators and burgee staffs are not included provided the backstay is not attached to them in order to circumvent the 70" maximum mast height specification.
Typical Slotted Aluminum Masts for model sail boat

photo's courtesy of "Larry Ludwig" at www.LudwigRCYachts.com, Ludwig Mfg.
Sailing Model, AMYA Star45 Class | Booms
AMYA Star 45 Class Rules, 2006, Boom
4.0 BOOMS:
4.1 The main boom and jib club shall not exceed 5/8" when measured at the thickest point. Booms and jib clubs shall be constructed of wood, aluminum and/or fiberglass.
Some typical Fittings for sailing model


photo's courtesy of "Larry Ludwig" at www.LudwigRCYachts.com, Ludwig Mfg.
==
A simple and light weight plywood strut made from scrap 1/32 or 1/16 ply.

A sample of one builder's standing rigging fittings bill of materials
Sources:
http://gbmy.com/
http://www.worthmarine.com/
Main Boom kit #100L
Jib boom kit #102
Gooseneck/kicking strap #112
Head fitting #120
Turnbuckle (2 pk) #260 Need 4 total
Tangs (4 pk) #282 4 is all you need
Bowsies(10 pk) #199
KDH single block #250 Two each
Sheet Hooks (20 pk) #280
Of course there’s many things that can be substituted.
Instead of wooden or arrow shaft booms, airplane clips instead of the turnbuckles and so on.
From: "Robert Gonzalez"
Subject: Re: Rig Parts for Star 45
Date: Tuesday, June 05, 2001 1:17 PM
I ordered both size head cranes - I think the smaller one is ok, but I'm not
sure. Woody has one and is bent more at 90 degrees since according to the rules
the crane is included in the 70" mast height.
I also ordered the 1/2" mast head and foot inserts. They don't fit the new masts without being sanded down some.
I wasn't sure what I wanted to do for an adjustable foot. I ordered the Sail Etc
deck track and adjustable mount. Mine has popped out on Woody more than once.
Don (at Great Basin) doesn't offer many choices for these parts.
I need some more Pekabe fairleads if I run the rigging under the deck and if not
then Woody has three blocks on deck - using the bungee method.
I got the side stay racks this time and the jib rack - not sure I'll use them or
not.
Quick release turnbuckles are nice. At $10 ea - they're kind of high dollar
but easy to use. Don>>the KDH quick release turnbuckles are 2 to a package for 10.90.
Main Booms, Goosenecks, and Vangs,
The main boom of a model is linked to the mast by a swivel connector which allows the boom to swing from side to side.
Typically the boom on a model needs to kept from lifting when the sails are not trimmed in hard.
To keep the main boom from flying up a "boom vang" kicker a simple device is set between the boom and the foot of the mast. Vangs take a variety of forms from a trunbuckle, to a piece of fishing line to a line controlled by a servo to allow the boom to be pulled down or allowed to raise up.
Star 45 Model Sailboat,
GET THAT TOPPING LIFT RIGHT
(if you wanna go fast)!
By Phil Geren
Of all the go fast stuff I have learned from tuning experts over the past year, the most valuable, and the thing that has provided the most additional boat speed for my 13#-3.5oz Star 45 (the "Fat Lady") is how to get the Jib's topping lift set right. I am doing much better in my racing since learning this.
The curve of the leech of the Jibsail MUST resemble as closely as possible the curve of the leeward surface of the Mainsail when sighting from the foredeck. If the Jib's leech is flatter or fuller your boat will not attain its speed potential while beating and reaching.
The topping lift enables you to get the curves aligned. Tightening the topping lift makes the Jib's leech fuller, more curved. Loosening the topping lift makes the Jib's leech flatter. With a little practice you can get the curves to be identical.
Here's how:
Pull the Mainsail in to the beating position; Swivel the Jib boom with your finger (apply only lateral force, no upward or downward force on the Jib boom) so that when you sight from the foredeck and look up and down the curve of the windward surface of the leech of the Jibsail it is superimposed on the curve of the back (leeward) surface of the Mainsail.
Are the curves identical? If not, is the Jib's leech more curved?
If it is, loosen the topping lift.
If the Jib's leech is flatter, tighten the topping lift.
Make small adjustments. This is very sensitive, and you can get it right if you persevere.
Recheck the need for adjustment after every few heats of racing or if you change anything else.
On sailboats EVERYTHING is related to everything else, and you will need to readjust periodically to maintain your added speed.
Don't have a topping lift? INSTALL ONE NOW! You won't believe the improvement!
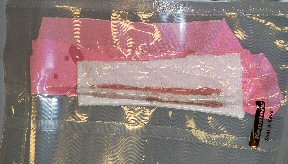
Construction Star 45, Sail Making,
colored sails, sail material
Apr 2007 Subject: [Star45] Sails - colors
--
From: "Larry Ludwig" mailing list Star45@yahoogroups.com
You can have colored sails. You can make your own from ripstop and the colors are all available. The material is inexpensive enough that even if you do botch the first few attempts it's not going to set you back more than $10.00
Learning to make sails teachs you more about TRIMMING sails and the way they take a "set" than sailing a boat ever will.
If you set your mainsail luff as a bolt rope (and you should IMHO) then it takes only a few seconds to pop off your mast head or foot, slide out one sail and slide in the other. Then if your jib is setup as a hook attachment to a hole in the mast, you unhook from the deck, unhook from the mast and voila, you are ready to hook both ends of the 2nd sail and you are complete. You should be able to change the sails on your boat in 2 minutes if you are properly set up. Of course, using a 2nd mast and complete rig is even faster. If you setup so your turnbuckles remain on the deck, then they are ready to go regardless of which rig you chose, and you reduce the cost of a 2nd rig by $40 right there.
Don't discount ripstop sails too much. They may not be all the rage... but I promise you the skipper skill factor is WAY more important than the sail material. I have rip stop sails here that have lasted 20 years, if they are well cared for, they will last. Skippers familiar with the Vic class will remember a Regional Regatta being won with a stock ripstop mainsail last year ( I think it was)
Give it a shot, you won't be sorry you did. *and it DOES look very nice on your boat.
--
From: "J Fisher" Sender: Star45@yahoogroups.com Subject: Re: [Star45] Sails - colors
I have seen people in the 914 fleet use colored markers to color sails. I think it was mostly to tell the boats apart, but there were some interesting designs. You could probably paint your sails as well to get color.
--
From: jfisher@wildblue.net I have made a lot of sail and could put together a step by step to make sails.
I use mylar which I buy from www.McMaster.com. They only carry clear, so I sand it to make it translucent. It colors well with markers so that would be one way to make colored sails. To make sails you can use the sail block based on the method provided on the star 45 yahoo groups by John Whitford or you can use the block from great basin, which is based on the Sweede Johnson sail block. I have used the sweede block with good results.
--
From: "Larry Ludwig" Sender: Star45@yahoogroups.com Subject: RE: [Star45] Sails - colors
You can make panelled sails, but it is not required. You can get PLENTY of use out of a single panelled sail. They actually have some advantages in high winds because of the less draught. Also, but putting in the luff curve and using a bolt-rope main, you do have a sail with some draught to it, not just a flat sheet of cloth. The block method works fine, but also.. is not required. Basically you cut the bottom panel seam flat, and draw your airfoil MAC (mean aerodynamic chord) and cut it with a #9 X-acto or scissors. Use seamstress tape and overstitch. Do the same thing with the luff curve, and hem the foot and leech and you are about there. Oversew some corner panels, tack on some batten pockets and thread in a piece of weed-eater line up the hem of the luff and you are ready to put on your class markings and numbers. Grommets in the corners are installed either with a seamstress tool or they could be ordered from Don Ginther at GBMY if he is still shipping, he was in the process of suspending operations.
Where to find the material? Nylon ripstop is inexpensive... typically $6-$7 (x 38-50" long bolt) a yard at LONDON's Fabrics or HANCOCK Fabrics, sometimes you will find it at HOBBY LOBBY retail stores, but if you check your local fabric store you will most likely come up with some in various colors. Also using contrasting thread colors can make the sail more attractive. Start with a single panel sail and go through all the steps. When you are ready to start making paneled sails... don't be afraid to make them out of paper first. Typical brown paper can be cut and taped together and makes a perfect mock up of the sail for pennies.
--
From: "Al Stein" Sender: Star45@yahoogroups.com Subject: [Star45] Re: Sails - colors
I think I got mine from Potomac Sailmakers in Alexandria, Virginia... I bought yellow and orange, but they had a bunch of different colors in spinnaker cloth, and very light weight and airtight it is.
It's fairly stiff, too, for as light as it is -- something well under an ounce per yard. Price about the same as Larry experienced... less than $10 a running yard from a BIG WIDE bolt (can't remenber exact width, but it was much wider than normal fabric store goods.
--
From: "John & Kelly" Sender: Star45@yahoogroups.com Subject: RE: [Star45] Sails - colors
I have built US One Meter sails from spinnaker cloth purchased from Sailrite.
I used .5 oz which is only available in red, white, and blue, but .75 oz is available in a multitude of colors.
The part I like best about these materials is you can buy a role of C3 spinnaker tape (pricey at $25.00) and build a set of sails without sewing a stitch.
They actually use C3 to tape together the body seams of full scale spinnakers so I'm pretty sure it can take just about anything a model can throw at it.
I've built two sets of sails and only used about 10% of my role of tape so that $25.00 will go a long way.
At about $12.00 a yard, spinnaker cloth is twice the cost of fabric store ripstop, but spinnaker cloth is coated with resin that makes it far more stable and eliminates all porosity (wind can blow right through ripstop). I also haven't tried using C3 on plain ripstop, so I can't say how the bond will hold up.
For cutting fabric like this I'd use a hot knife. I bought a $4.00 40watt soldering iron at the local mega-mart, removed the tip, hammered it flat, and put it back in. Cutting works best over a smooth heat resistant surface. I use my glass topped kitchen table (when my wife's not home).
--
--
From: "Larry Ludwig"
You can have colored sails. You can make your own from ripstop and the colors are all available. The material is inexpensive enough that even if you do botch the first few attempts it's not going to set you back more than $10.00
Learning to make sails teachs you more about TRIMMING sails and the way they take a "set" than sailing a boat ever will.
If you set your mainsail luff as a bolt rope (and you should IMHO) then it takes only a few seconds to pop off your mast head or foot, slide out one sail and slide in the other. Then if your jib is setup as a hook attachment to a hole in the mast, you unhook from the deck, unhook from the mast and voila, you are ready to hook both ends of the 2nd sail and you are complete. You should be able to change the sails on your boat in 2 minutes if you are properly set up. Of course, using a 2nd mast and complete rig is even faster. If you setup so your turnbuckles remain on the deck, then they are ready to go regardless of which rig you chose, and you reduce the cost of a 2nd rig by $40 right there.
Don't discount ripstop sails too much. They may not be all the rage... but I promise you the skipper skill factor is WAY more important than the sail material. I have rip stop sails here that have lasted 20 years, if they are well cared for, they will last. Skippers familiar with the Vic class will remember a Regional Regatta being won with a stock ripstop mainsail last year ( I think it was)
Give it a shot, you won't be sorry you did. *and it DOES look very nice on your boat.
--
From: "J Fisher"
I have seen people in the 914 fleet use colored markers to color sails. I think it was mostly to tell the boats apart, but there were some interesting designs. You could probably paint your sails as well to get color.
--
From: jfisher@wildblue.net I have made a lot of sail and could put together a step by step to make sails.
I use mylar which I buy from www.McMaster.com. They only carry clear, so I sand it to make it translucent. It colors well with markers so that would be one way to make colored sails. To make sails you can use the sail block based on the method provided on the star 45 yahoo groups by John Whitford or you can use the block from great basin, which is based on the Sweede Johnson sail block. I have used the sweede block with good results.
--
From: "Larry Ludwig"
You can make panelled sails, but it is not required. You can get PLENTY of use out of a single panelled sail. They actually have some advantages in high winds because of the less draught. Also, but putting in the luff curve and using a bolt-rope main, you do have a sail with some draught to it, not just a flat sheet of cloth. The block method works fine, but also.. is not required. Basically you cut the bottom panel seam flat, and draw your airfoil MAC (mean aerodynamic chord) and cut it with a #9 X-acto or scissors. Use seamstress tape and overstitch. Do the same thing with the luff curve, and hem the foot and leech and you are about there. Oversew some corner panels, tack on some batten pockets and thread in a piece of weed-eater line up the hem of the luff and you are ready to put on your class markings and numbers. Grommets in the corners are installed either with a seamstress tool or they could be ordered from Don Ginther at GBMY if he is still shipping, he was in the process of suspending operations.
Where to find the material? Nylon ripstop is inexpensive... typically $6-$7 (x 38-50" long bolt) a yard at LONDON's Fabrics or HANCOCK Fabrics, sometimes you will find it at HOBBY LOBBY retail stores, but if you check your local fabric store you will most likely come up with some in various colors. Also using contrasting thread colors can make the sail more attractive. Start with a single panel sail and go through all the steps. When you are ready to start making paneled sails... don't be afraid to make them out of paper first. Typical brown paper can be cut and taped together and makes a perfect mock up of the sail for pennies.
--
From: "Al Stein"
I think I got mine from Potomac Sailmakers in Alexandria, Virginia... I bought yellow and orange, but they had a bunch of different colors in spinnaker cloth, and very light weight and airtight it is.
It's fairly stiff, too, for as light as it is -- something well under an ounce per yard. Price about the same as Larry experienced... less than $10 a running yard from a BIG WIDE bolt (can't remenber exact width, but it was much wider than normal fabric store goods.
--
From: "John & Kelly"
I have built US One Meter sails from spinnaker cloth purchased from Sailrite.
I used .5 oz which is only available in red, white, and blue, but .75 oz is available in a multitude of colors.
The part I like best about these materials is you can buy a role of C3 spinnaker tape (pricey at $25.00) and build a set of sails without sewing a stitch.
They actually use C3 to tape together the body seams of full scale spinnakers so I'm pretty sure it can take just about anything a model can throw at it.
I've built two sets of sails and only used about 10% of my role of tape so that $25.00 will go a long way.
At about $12.00 a yard, spinnaker cloth is twice the cost of fabric store ripstop, but spinnaker cloth is coated with resin that makes it far more stable and eliminates all porosity (wind can blow right through ripstop). I also haven't tried using C3 on plain ripstop, so I can't say how the bond will hold up.
For cutting fabric like this I'd use a hot knife. I bought a $4.00 40watt soldering iron at the local mega-mart, removed the tip, hammered it flat, and put it back in. Cutting works best over a smooth heat resistant surface. I use my glass topped kitchen table (when my wife's not home).
--
Star 45 Construction | Class rules regarding Keels
Class specifications as of 2006:
7.0 KEELS AND BALLAST BULBS:
7.1 Keel will be of the style known as drop, and will be of the FIN and BULB type.
7.2 Keel fins may be solid or hollow and constructed of reinforced plastic, plastic laminates, fiberglass, wood or metal. (Note: Strength and integrity of the keel fins must be maintained whether built solid or hollow.) Keel fin shape is not specified but must follow the general shapes outlined on the reference drawing. However, keels will not be less than 6 inches nor more than 8 inches long (Fore and Aft) at the keel/hull junction, nor less than 4 inches nor more than 6 inches long (Fore and
Aft) at the keel/ballast bulb junction.
7.3 Keels, keel fins and ballast bulbs may be removable, however, they may not be changed, interchanged, substituted or otherwise manipulated once any heat or series of heats in which scores will be compiled, has started. Mechanically movable keels or ballast bulbs are specifically prohibited from use in Star 45 Class Yachts.
7.4 Ballast bulbs may be constructed of any material not prohibited by the AMYA. The actual shape is left to the builder's discretion, but will not exceed 9.75 (9 3/4) inches from the front of the keel bulb to the rearmost point of the keel or bulb.
7.5 Total drop (length) of the keel fin/ballast bulb combination will not exceed 11.5 (11 1/2) inches when measured from the keel/hull junction, before any fillers or streamlining is added.
7.6 Ballast may be made from any readily available material, such as poured lead, lead shot, etc. (Note: When using material such as lead shot, the mass must be solidified through the use of a bonding agent such as fiberglass or epoxy resin, plaster of paris, poured over and through in order to create a solid mass.)
7.7 Race directors may elect to use a template based on the construction plans to determine the keel length (depth).
7.8 Keel depth shall be measured from the center of the keel fin at the hull to the bottom of the ballast bulb. This measurement is from the edge of the bottom of the hull as it meets the side of the keel and should be determined during construction and before any fillet or fairing is added.
7.9 The Star 45 Class specifically excludes radio equipment, sail controls and batteries (power cells) from being considered ballast. This specification defines ballast as anything carried aboard the model for the main purpose of changing the weight distribution of the model and/or weight of the model. Ballast shall be fixed in place by gluing, fiberglassing, or bolting (bolts and screws).
7.9.1 Ballast may not be removed or relocated during any one regatta. The use of Velcro or similar quick release fasteners is prohibited as methods of mounting ballast.
Sailing model boat | making your own keel bulb
From: "Jim Adams"
I made a plug from balsa and finished it to a smooth finish.
Using two aluminum pans (the kind that you throw away). Fill the first one with plaster took the balsa-bulb (well waxed) and placed it in the plaster half way in. I used two pins through the center to hold it down.
Let the plaster harden, then pull out the balsa-plug. Next put thin saran wrap over the mold and place the balsa-plug back in the mold. Now comes the fun part I used rubber bands to hold the plug in place (remember I had two pins that extend past the mold walls). Fill the second pan with plaster and lay the first on top, it is kind of messy but it works. When the second half hardens (about two hours) pull them apart. You will need to plug the holes at the ends on the sides and create small air path upward in the and a spur (looks like a funnel when you are done this needs to be big enough to pour in the lead) at the end.
==
Pouring molten lead is dangerous. The plaster mold which Jim Describes must be absoultely dry and free of moisture or the lead can spray out ot the spur.
Sailing Model, AMYA Star45 Class | Decking
From Terry Forbes:
"The Star 45 boats that I have built have decks made from bass wood strips that are 1/4" X 1/16". I find them easy to use and easy to bend with out fracturing. I use thick ca to bond to hull frames and to the adjoining strip. When is have it all glued down, I sand with 120 grit and then 200. I use a soft rag to wipe off deck but leave the cracks filled with the sanding dust or "wood Flower" I then give it a thinned coat of slow cure epoxy. This first coat will soak into the wood completely. I then use un-thinned epoxy for the second and third coat, wet sanding and tack ragging between coats. If you want a really glassy deck, I use a finish coat of Captians Spar varnish. I have used this finish technique on full scale boats and all of my Kayaks. Very nice and durable finish. The decks go on easy and I try to stagger the strips one dark one light. I built a full scale star in the early 60's and had a striped planked deck. I like the look and it builds light. It keeps the hull true as sometimes when you add the deck using plywood it can cause it to move around. I will post some photos of my next hull as it comes to life. I have constructed a ships-way. I used the formers that are shown on the IMYA star plans. I now only have to cut the actual hull formers. I Stack cut 4 at a time on my trusty Dremmel Moto Shop Saw. I have added some lighting holes here and there. All in all I can have a hull lofted in 1 hr. and the sides on that evening using 20-min epoxy to coat the frames and the inside of the hull side. I first made my side peaces out of poster board. This allowed me to get the fit close and have a template to trace the sides for cutting. "
S45 Construction Deck
4/19/2007 John Fisher just finished the deck rigging last night on his latest boat. The boat is set up pretty simple. Open loop with elastic. Winch is below deck, but the same rigging setup can be used with an on deck winch, just substitute a turning block for the through deck block.
The sheets go forward to a block on a bridle for the main sheet. The jib sheet and elastic go through a double block attached to the chain plate to keep things from rubbing on the mast, then through an adjustable double block forward. The jib sheet then goes back to a deck mounted block. The elastic is then hooked to a loop on deck. John put a hook in the elastic so he can release tension when in storage.
Chain plates and mast step are laid out per Scott Rowlands tuning guide.


In tweaker photo bellow you can see the tweaker servo and winch mount.

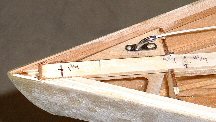
Sailing Model, AMYA Star45 Class | Construction Deck(s), Hatches
from John Fisher:
Attaching deck to hull
John Fisher photographer
Hull with deck mounted:

John Fisher photographer
--------------------
HATCHES:
From Phil Geren:
The simplest hatch cover solution I have found for Star 45 is to cut a piece out of Presentation Cover vinyl, which cut-out is shaped like the hatch opening but 1/4 or 3/8 of an inch larger on all sides. Then, apply electrician's tape (1/2 or 3/4" wide) all around the perifery, so that half the tape is on the vinyl and half is hanging over the edge.
Presentation Cover vinyl which I get at Office Depot is about 15 cents a sheet; it is about 0.008" thick; it is slightly over 8.5X11" in size; a full sheet weighs about 16 grams; it is stiff, but flexible; it is crystal clear, but if you want it opaque, just wet sand it with #400 grit wet or dry sandpaper.
Position the hatch cover over the hatch so that the tape extends evenly past the hatch opening an equal distance all around, and then just press on the tape to stick it to the deck. It's waterproof, durable.
You can make spares and stick them to another piece of vinyl and carry that with you to the races. That keeps spares nice and flat and keeps the tape's sticky side clean for future use. A set of these hatch covers usually lasts me all season. At lunch, I take one cover off to allow the boat to dry out, sticking the cover to a dry vinyl sheet to keep the tape's sticky side clean.
Photo is Star 45 #778, freshly rebuilt for the Nationals this year, and a set of covers on the floor next to her.
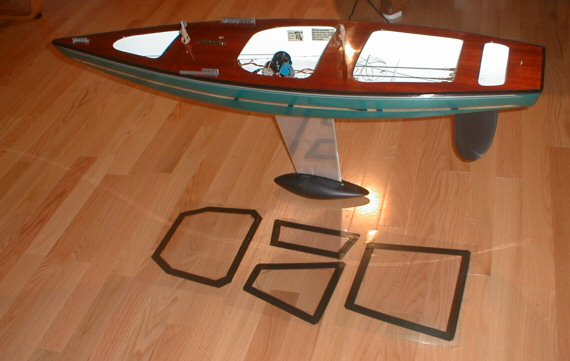
Phil Geren photographer
--
from Uncle Dave:
I pulled one of my old Star45's from the attic and have it here in my workshop. It has a fiberglass Sirius 45 hull, a aircraft ply deck and aluminum keel fin. Unfortunately it is not one of my finest examples of workmanship or painting. However I'll suffer the embarrassment and use if to show some one style of hatch construction.
Carrying around a model around out of the water is no big deal. Taking a model out of the water can be something else. You first need to hang onto the model. Then find a place to take hold to lift the model. This is one of the reasons I have used easily removable hatches. You can grab the model through the hatch, fingers under the deck and pick it up. Of course a thin ply deck the model deck and hatch construction needs to be strong enough to withstand pulling on the deck and lifting a twelve pound plus model. Therefore I braced my decks around hatch areas.
First I built a flanged frame for the hatch to sit in that also extended under the deck and attached to the deck bracing.

Then I built a hatch cover based on the size of the hatch. Initially the hatch cover was made to fit very loosely in the hatch. I then took some silicone (tub seal or similar) squeezed a bead around the shelf/lip of the hatch. The covering the hatch opening with food wrap poly sheeting I'd push the hatch cover in place down into the silicone. This made a nice water tight gasket around the edge of the hatch. After waiting a day I'd remove the plastic, trim and silicone that showed topside. With the silicone dry, pop the hatch cover in place and check the fit.

I placed a strip of magnetic tape on either end of the cover and on each end of the hatch frame.

When the hatch cover and hatch mag tapes touched they pulled together. This magnetic tape is neat stuff you can pop the cover in place and it will stay put.
Typically I made my hatches about 4"X5" giving me plenty of deck to the sheer.
I heavy weather if the model might go over on beams end I'd cover the seams with tape just to be extra watertight. A 4X5 hatch gives room to get inside, adjust winch, radio etc, and to remove any water that got into the bilge while sailing.
Subscribe to:
Posts (Atom)