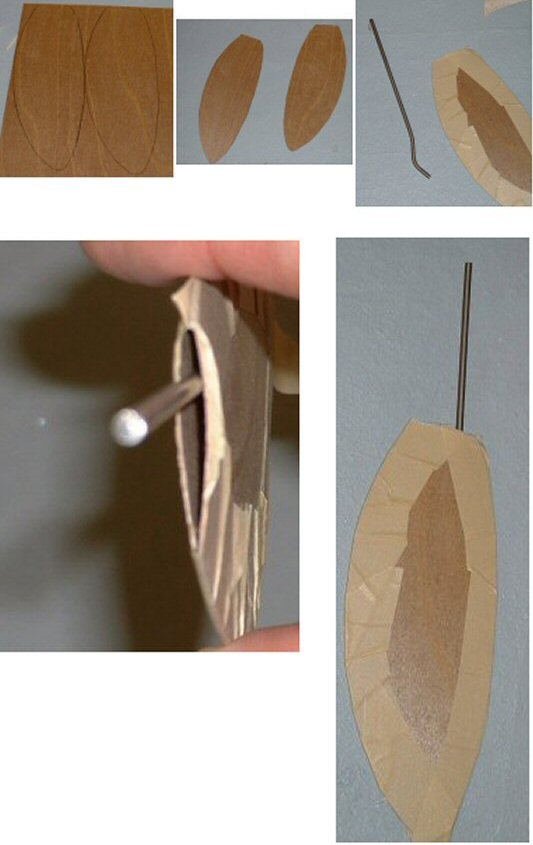
Here are some photo's showing one way to build a rudder quickly and easily. The quick overview is cut out the shape in a thin material, tape the sides together, insert the rudder shaft, fill the inside of the rudder with epoxy. This takes about 10 min or so to do. Followed by installation in your boat.
John Fisher
Lay out the rudder shape on a sheet of 1/64 ply. On other class boats John used a single layer of a 6 oz carbon fiber layup, so you could also lay up some fiberglass for use on the star. To do a glass layup, just take a sheet of 6 oz or heavier fiberglass, a sheet of lexan or plexiglass, and some resin. The first step is to spread resin on the plexiglass, then apply the fiberglass and then make sure it is all wetted out. Once cure flex the plexiglass and the layup will pop off.
Shows the two sides cut out of plywood, these could be fiberglass instead. Straight sided shapes like shown and the star plans are easier to make.
Tape the two sides together with masking tape. With curved shapes He taped them together then insert the shaft and resin. If you use straight sides on the rudder you can tape one side and then open it up like a book, apply resin, then close and tape shut. The open book method uses less resin but only works with sq or straight sided shapes.
Note the bend John put in the shaft to prevent it from turning inside the rudder.
Shows the top open to pour in resin. John uses a syringe to pour in resin once the shaft is in place. You can add micro balloons to the resin if concerned about weight.
Installing Rudder in Star 45


Showing posts sorted by relevance for query rudder. Sort by date Show all posts
Showing posts sorted by relevance for query rudder. Sort by date Show all posts
20110503
Sailing Model, AMYA Star45 Class | building rudder
John Fisher photographer


Star 45 Rudder Construction, using laser cut laminations


Star45 : Message: Re: [Star45] naca0009 rudder: "Re: [Star45] Photo's of naca0009 rudder
I am happy with how they turned out. I sent the production files to Stevens Monday, so you should be able to order a rudder if you need one. He doesn't have it posted yet, but if you call him he can cut them for you.
I built mine by clamping all the pcs together with the alignment pins in place (1/8 sq stock left over from stringers). Then CA'd it together with thin CA. I used my random orbital sander with 150 grit to shape it. Took about 15 min or so. With the different layers you can see if you are removing material evenly. Once sanded I sprayed the rudder with 3M 77, covered with 3 oz glass, one PC folding it over the leading edge so there is no seam on the leading edge. I then added resin and vac bagged in my handy food saver. The next day I pulled off the breather and peel ply, sanded smooth and varnished.
The glass is probably not needed since the core is made out of ply. I used the glass to ensure it is not coming apart and only adds another 10 min or so to do. With the vac bagging it is very smooth and uniform with only a little sanding required to remove the texture of the peel ply. I did buy a yard of breather and peel ply, but waxed paper with holes in it and paper towels can be substituted."
Drawings are available from the Yahoo Star45 group "files"
==


Steps toward building a sailing model
Building Displaying Sailing
Model Boats and Ships
So you want to build a sailing model
Find plans for a sailing model, buy or find on-line.
Join a model boat forum for advice.
Buy or borrow books on boat building.
Decide on type of planking and wood to be used to build the model.
Set aside a work space for building.
Review the bill of materials need to build the model and buy the materials.
Order deck and mast fittings.
Order mast (if you are buying the mast) and order sails (or sail material).
Choose the radio system, buy a sail control unit, Order keel bulb or get advice and discuss issues of building your own.
While the hull is under construction build:
Keel fin and ballast bulb
Rudder assembly
Make or assemble spars ( mast and booms)
Build cradle to hold boat under construction and when finished.
Test Radio System and sail control unit
After hull is planked:
Install keel trunk or make provisions for mounting keel.
Install radio and sail control unit, Then remove while construction continues.
Construct deck and hatches
Install/mount deck fittings
Test access to radio and sail control inside the hull.
Provide a exit guide for radio antenna so it can be attached to mast or stays.
Install power switch for turning off batteries
Test mount keel
Paint hull, rudder and keel
Assemble hull, rudder and keel
Set up mast and boom.
Install radio controls.
Check running rigging.
Attach Sails
dry sail model
--
Sail
Display
Storage
20061008
Builders to do list,
Order Star 45 construction drawing from AMYA store
Buy or borrow books on boat building. Join the Star45 discussion forum.
Decide on type of planking and wood to be used to build the model.
Set aside a work space for building.
Review the bill of materials need to build the model and buy the materials.
Order deck and mast fittings.
Order mast (if you are buying the mast) and order sails (or sail material).
Choose the radio system, buy a sail control unit, Order keel bulb.
While the hull is under construction build:
Keel fin and ballast bulb
Rudder assembly
Make or assemble spars ( mast and booms)
Build cradel to hold boat under construction and when finished.
Test Radio System and sail control unit
After hull is planked:
Install keel trunk or provisions for mounting keel.
Install radio and sail control unit, Then remove while construction continues.
Contstruct deck and hatches
Install/mount deck fittings
Test access to radio and sail control inside the hull.
Provide a exit guide for radio antenna so it can be attached to mast or stays.
Install power switch for turning off batteries
Test mount keel
Paint hull, rudder and keel
Assemble hull, rudder and keel
Set up mast and boom.
Install radio controls.
Check running rigging.
Attach Sails
dry sail model
--
Sail
Display
Storage
Buy or borrow books on boat building. Join the Star45 discussion forum.
Decide on type of planking and wood to be used to build the model.
Set aside a work space for building.
Review the bill of materials need to build the model and buy the materials.
Order deck and mast fittings.
Order mast (if you are buying the mast) and order sails (or sail material).
Choose the radio system, buy a sail control unit, Order keel bulb.
While the hull is under construction build:
Keel fin and ballast bulb
Rudder assembly
Make or assemble spars ( mast and booms)
Build cradel to hold boat under construction and when finished.
Test Radio System and sail control unit
After hull is planked:
Install keel trunk or provisions for mounting keel.
Install radio and sail control unit, Then remove while construction continues.
Contstruct deck and hatches
Install/mount deck fittings
Test access to radio and sail control inside the hull.
Provide a exit guide for radio antenna so it can be attached to mast or stays.
Install power switch for turning off batteries
Test mount keel
Paint hull, rudder and keel
Assemble hull, rudder and keel
Set up mast and boom.
Install radio controls.
Check running rigging.
Attach Sails
dry sail model
--
Sail
Display
Storage
20100826
Lester Gilbert on boat balance
Model Boat journal
Lester Gilbert on boat balance
The boat is balanced by either moving the sail plan forward to reduce weather helm/increase lee helm, or moving the sail plan back to reduce lee helm/increase weather helm. Depending upon the mast step you have in your hull, you'll do this by raking the mast (pivoting it on its heel), or moving it fore and aft in a mast slot.
For any given hull/rig combination, Graham Bantock feels the degree of weather helm is dictated by three basic factors:
* mast rake/mast position
* relative twist in main and jib
* relative sheeting angle of main and jib
with the minor factors:
* relative camber of main and jib
* relative shape of main and jib.
He goes on to say:
There is a fairly small range of successful pairings of twist and sheeting angle. The sheeting angle ranges are covered by the range 8 to 15 degrees for the jib, and 2 to 8 degrees for the main. Keep the twist in the sails so they look much the same from astern. Use mast rake/mast position and relative sheet angle to tune the balance. Use sail camber primarily as a throttle - fairly flat in very light airs, fuller as wind speed increases up to the point where you need to keep the boat more upright for best speed and pointing when you flatten sharply. Camber can also be used to adjust the helm of the boat. Experiment.
As far as I can tell, my Ikon and Italiko tune up just like any other IOM, the major issue being to get their balance right -- ie, appropriate weather helm. So far, I've found both work best for me with a touch of weather helm, that is, when they reliably round up into the wind rather than sailing "neutrally" with my finger off the rudder stick. If you have your rudder trim calibrated, I'd suggest going for that amount of mast rake which gives you about 2 or 3 degrees of weather helm as the "ideal".
As an aside, some sailors feel that mast rake does other things for you, perhaps improving the lift characteristics if the mast is raked well back to give some sort of "sweepback". As far as I can see, mast rake in an IOM is exclusively concerned with boat balance and helm, and has negligible other effects on any other characteristics of the boat.
There is an aspect of helm that has puzzled me for quite a while, and that is the phenomenon called "snap" weather helm. This happens when an otherwise well-behaved boat luffs violently into wind when a puff hits, and I had this problem with my Ikon. When I started sailing my Italiko and until recently, I never encountered it, and began thinking that snap weather helm might be a characteristic of hull shape. I realised I was wrong about hull shape when my Italiko snapped back at me, and I spent a little time investigating. It now seems to me that I had inadequate rig tune.
20110503
S45 Construction templates for laminating rudder


Rudder templates for a Star45 Class sailing model.The grid shown is set for 1/4 inch squares. So if you print the templates you can check the size by making sure the grid yields a 1/4 inch square.
This set of templates are based on drawing from John Fisher. John may have new and updated drawings available. Check with http://groups.yahoo.com/search?query=star45 membership required.
I want to thank J. Herrmann, www.graphicLanguageOnline.com, for his assistance in converting pdf's to jpg drawing, adding color to the templates and adding the grid to the final images.
20061008
Sailing Model, AMYA Star45 Class | Rudder
AMYA Star 45 Class Rules, 2006, Rudder
6.1 Rudders may be constructed of wood, fiberglass, plastic, plastic laminates or metal. The exact shape is not specified, but they may not exceed 4 1/2 inches at the hull (fore and aft) 3 inches at the bottom, (fore and aft); and may not project more than 7 inches below the hull when measured at the post..
Star 45 Setting Sail -- on-line "How To Sail" resources
From: "Don Keeney" <1keyknee@281.com>
Date: Sun, 19 Nov 2006 15:39:26 -0600
Subject: [Star45] Sail Trim
A great place to learn about sail trim and sailing in general.
http://www.sailingusa.info/sail_trim.htm
Don Keeney
Star 45 Class Secretary
--
Outstanding recommendation. Wonderful site. full of photographs and all sorts of instructional materials. Pictures of tells and how to read them:)
Another must place to visit (you can try out your sailing skills):
National Geographics Interactive Sailing:
Master rudder and sail to get your boat going as fast as possible no matter what direction you're sailing in-or which way the wind's blowing.
Controls available:
Sail Adjuster: Use the left sliding controller to rotate the sail in relation to shifting wind (shown as arrows). When you cross the path of the wind, your sail will swing to the opposite side.
Rudder Adjuster: Using the right sliding controller, steer to port (left) or starboard (right).
Uncle Dave
Date: Sun, 19 Nov 2006 15:39:26 -0600
Subject: [Star45] Sail Trim
A great place to learn about sail trim and sailing in general.
http://www.sailingusa.info/sail_trim.htm
Don Keeney
Star 45 Class Secretary
--
Outstanding recommendation. Wonderful site. full of photographs and all sorts of instructional materials. Pictures of tells and how to read them:)
Another must place to visit (you can try out your sailing skills):
National Geographics Interactive Sailing:
Master rudder and sail to get your boat going as fast as possible no matter what direction you're sailing in-or which way the wind's blowing.
Controls available:
Sail Adjuster: Use the left sliding controller to rotate the sail in relation to shifting wind (shown as arrows). When you cross the path of the wind, your sail will swing to the opposite side.
Rudder Adjuster: Using the right sliding controller, steer to port (left) or starboard (right).
Uncle Dave
20110503
Star45 Hull Templates and shadows


The grid shown is set to 1/4 inch squares. So if you print the templates you can check the size by making sure the grid yields a 1/4 square.
Modelers will use different building materials for the model.These are JPG drawing and print outs may require adjustments to get the widths to correct sizing. For a Star45 AMYA class you need to make adjustments to allow for planking thickness. The rules establish the maximum allowable beam dimension and hull length.
Most browsers will allow you to right click and open the jpg files. You can then save them to your machine.
This set of templates are based on drawing from John Fisher back around August 2006. John may have new and updated drawings available. Check with http://groups.yahoo.com/search?query=star45 membership required.
If you want to scale to use for different model you can change the print out to give you a different grid size.
I want to thank J. Herrmann, www.graphicLanguageOnline.com, for his assistance in converting pdf's to jpg drawing, adding color to the templates and adding the grid to the final images.Rudder templates for a Star45 Class sailing model.The grid shown is set for 1/4 inch squares. So if you print the templates you can check the size by making sure the grid yields a 1/4 inch square.
This set of templates are based on drawing from John Fisher. John may have new and updated drawings available. Check with http://groups.yahoo.com/search?query=star45 membership required.
I want to thank J. Herrmann, www.graphicLanguageOnline.com, for his assistance in converting pdf's to jpg drawing, adding color to the templates and adding the grid to the final images.

These are half shadow that ar eplaced between the templates to add strength to the hull.
20061008
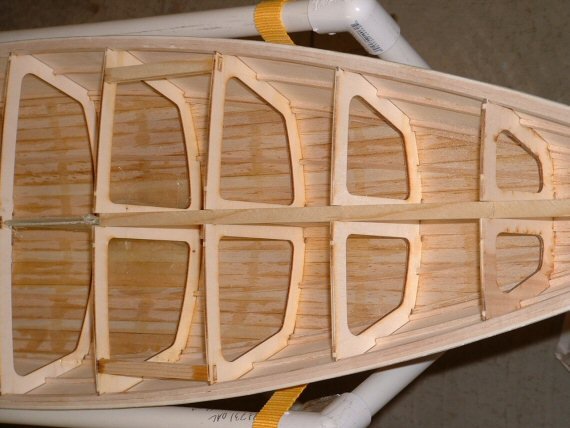
Sailing Model, AMYA Star45 Class | interior work, radio, sail controls, servos, mast support
Radio Board stringers between bulkheads
(Note the method of keel support using these stringers)
Radio Board
Rudder Servo
Mast support (inside hull)
Star 45 Keel fins building options, Star45
{Rule7.2}
Keel fins may be solid or hollow and constructed of reinforced plastic, plastic laminates, fiberglass, wood or metal. (Note: Strength and integrity of the keel fins must be maintained whether built solid or hollow.) Keel fin shape is not specified but must follow the general shapes outlined on the reference drawing. However, keels will not be less than 6 inches nor more than 8 inches long (Fore and Aft) at the keel/hull junction, nor less than 4 inches nor more than 6 inches long (Fore and Aft) at the keel/ballast bulb junction.
--
The Mainwaring Keel shape is a fine choice!
--
John Fisher suggests:
The quickest and easiest way to make them if you have access to a metal band saw is to draw the keel in CAD, then print it out. Glue that to a sheet of 3/32 aluminum with 3m77 and cut it to shape.
You could also do the same thing with sheets of plywood and layer it to achive a airfoil shape. Each layer should be smaller than the last and then sand to blend the layers. Could also make a good cad project.
Another way is to cut the shape in two pcs of 1/16 ply, then tape the edges together. Insert a couple of threaded rods between the two sheets for attachment. Then fill with epoxy and microballoons. Using this method you should also glass the outside for additional stiffness. There are photo's of making a rudder like this on the blog site.
--
Keel fins may be solid or hollow and constructed of reinforced plastic, plastic laminates, fiberglass, wood or metal. (Note: Strength and integrity of the keel fins must be maintained whether built solid or hollow.) Keel fin shape is not specified but must follow the general shapes outlined on the reference drawing. However, keels will not be less than 6 inches nor more than 8 inches long (Fore and Aft) at the keel/hull junction, nor less than 4 inches nor more than 6 inches long (Fore and Aft) at the keel/ballast bulb junction.
--
The Mainwaring Keel shape is a fine choice!
--
John Fisher suggests:
The quickest and easiest way to make them if you have access to a metal band saw is to draw the keel in CAD, then print it out. Glue that to a sheet of 3/32 aluminum with 3m77 and cut it to shape.
You could also do the same thing with sheets of plywood and layer it to achive a airfoil shape. Each layer should be smaller than the last and then sand to blend the layers. Could also make a good cad project.
Another way is to cut the shape in two pcs of 1/16 ply, then tape the edges together. Insert a couple of threaded rods between the two sheets for attachment. Then fill with epoxy and microballoons. Using this method you should also glass the outside for additional stiffness. There are photo's of making a rudder like this on the blog site.
--
S45 Model Boat construction | Sail Control Units
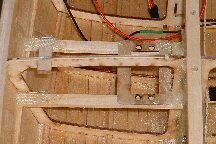
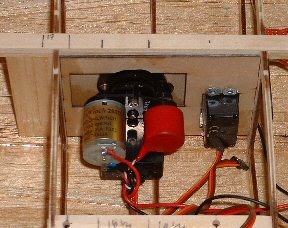
installing the radio tray for an under deck winch, jib tweaker, and rudder servo. From John Fisher:

The radio tray is 1/16 ply backed up with 1/8 X 3/8 spruce or basswood. Note the glassing at the ends. This adds a lot of strength to the joint and John highly recommend adding it. John uses 1" wide glass tape cut in half, then sprayed with 3M77 so it will stay in place for gluing. Then a dab of your favorite epoxy and you are done.
sheet through deck mount.
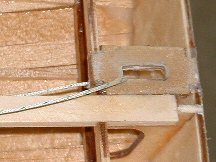
jib tweaker turn around. The part is a 180 deg sheet lead from great basin.
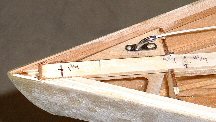
See also http://woodstar45.blogspot.com/2006/10/blog-post_116031550255831231.html
--
From: David Ramos To: Star45@yahoogroups.com
Sent: Fri, 14 Nov 2008 10:23 am
The following photos show my set up for a drum servo and jib tweaker.
--
Note:
One major advantage of building from a fiberglass hull is the open space inside the hull. David Ramos offers workmanship second to none.
Dave Mainwaring
--
http://www.rcyachts.com/STAR45/P1010084.JPG

http://www.rcyachts.com/STAR45/P1010082.JPG

Main sheet is 2:1 and jib sheet is 1:1
Hope this helps
David Ramos
Chesapeake Performance Models
227 Main Street
Stevensville, MD 21666
david@rcyachts.com
www.rcyachts.com
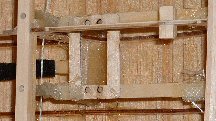
The radio tray is 1/16 ply backed up with 1/8 X 3/8 spruce or basswood. Note the glassing at the ends. This adds a lot of strength to the joint and John highly recommend adding it. John uses 1" wide glass tape cut in half, then sprayed with 3M77 so it will stay in place for gluing. Then a dab of your favorite epoxy and you are done.


sheet through deck mount.
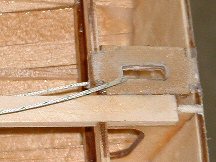
jib tweaker turn around. The part is a 180 deg sheet lead from great basin.

See also http://woodstar45.blogspot.com/2006/10/blog-post_116031550255831231.html
--
From: David Ramos To: Star45@yahoogroups.com
Sent: Fri, 14 Nov 2008 10:23 am
The following photos show my set up for a drum servo and jib tweaker.
--
Note:
One major advantage of building from a fiberglass hull is the open space inside the hull. David Ramos offers workmanship second to none.
Dave Mainwaring
--
http://www.rcyachts.com/STAR45/P1010084.JPG

http://www.rcyachts.com/STAR45/P1010082.JPG

Main sheet is 2:1 and jib sheet is 1:1
Hope this helps
David Ramos
Chesapeake Performance Models
227 Main Street
Stevensville, MD 21666
david@rcyachts.com
www.rcyachts.com
Dave's musings about setting up and adjusting sails on R/C model Boat.
Dry sailing -set up.
Place the model in a stand. Head the model into them wind.
Things that can be moved, and adjusted: Mast step. Mast rake. Boom vangs. Shrouds. stays. Jumper stays. Head stay/jib stay. Sail shape - loose foot. out-hauls.
Attach the sails to the mast.
Set the sail winches in fully trimmed position while allowing sheets to be slack.
Stand the mast with standing rigging attached in the center step position.
Hook the jib swivel into the middle slot of the jib rack. {The jib boom needs to clear the mast.}
Connect the side stays to the chain plates and adjust so the mast is straight and vertical.
Connect the back stay to the back stay fitting.
The jib stay and back stay will need adjusting to set the mast in vertical position.
Move the out-haul of the sails along the boom to give the sails to have some "belly". Pulling the sails out along the boom flattens their shape. The belly (or shape) of the sails will be determined later and the sail shape will be determined by how windy it is.
Where you attach the sheets to the booms will take into account the type and adjustments available for the sail control. The booms should be full out (90 degrees to the center line of the hull) when the SCU is full out and then the booms should be just about over the center line when fully trimmed in. ( I see 10 degrees as suggested angle to center line). The length of jib sheet trimmed and the length of main sheet trimmed is a factor in setting up the sail control so the sails are coordinated properly when sailing. The SCU handles a much longer main sheet than the jib sheet. The use of jib traveler and mainsheet traveler can help position the sails when fully trimmed in. Unless two servos (SCU's) are used a single SCU has the task of coordinating the positioning of the jib and main.
Turn on the R/C and run the SCU.
Test out SCU setting with the sails full out and fully trimmed.
With the mast set up and sails adjusted roughly in position it time to launch and sail.
--
Setting Sail on the water.
Before launching TURN on the radio on the boat. I have seen many models set loose to sail with the on board receiver and sail controls not tuned on and very unhappy skippers watching as their model sails away towards the horizon.
The initial rigging and sail settings are based in getting the model to sail a strait line while close hauled (sails trimmed in) and sailing up-wind.
Properly trimmed the rig will allow the model to sail it self in a straight line with just a minor tendency to "round-up" (i.e. sail itself dead into the wind). If or example you find you are constantly pulling the tiller (i.e. rudder) hard over to pull the model back on course to keep from heading in to the wind your model has weather helm which means your mast and jib must be re-positioned. When tacking if your model stall's into the wind and won't tack? Try different rig setting.
--
Setting Sails
The art of tuning the rig on a sail boat is detailed in books written for racing yachts and boats.
"DINGHY SAILS"
by Jeremy. Howard-Williams
"The Best of Sail Trim:
A Selection of Articles from Sail Magazine"
"Sail Trim: Theory And Practice"
by Peter Hahne
My observations and commentary on tuning are from an amateur and are at best suggestions not professional advice.
Observation Number One!!
Model sails that are single panel loose footed sails rely on the shape of the sail established by the gap between the boom and the foot of the sail. Model sails with "shape" sewn into the sail fabric still are loose footed. Also the lift of the boom also factors in determining the shape and performance of the sails.
Hauling a sail into the center line and at the same time pulling down on the sail can flatten the fabric and kill the sail shape. I like to use travelers to position the sail to the desired point near the center line. Then you can set the point of maximum driving force and not wreck the sail shape.
On a big boat the skipper can changer the suit of sails to match the cut of the sail with the wind conditions. In the case of a model a skipper can change where the out-haul is along the boom, light air adding belly to increase the drive, heavy air pulling the sail out further changing the sail's airfoil.
The jib and mainsail work as a system. A skipper has all manner of combinations that may be set relating the two sails. If the models did not have jib clubs they could overlap the mainsail. So model sailors have to adjust the "slot" between the jib and the main to get the maximum driving combined air foil.
In heavy air you may want to close the slot and ease the main so that the jib slightly back-winds the main to help the model sail flatter (less heeling).
Don't forget on a model it is easy to rake the mast fore and aft to trim the sailing characteristics to match wind conditions.
--
A digital camera can be a terrific diagnostic tool for seeing what is happening on your model. You can look at pictures and spot misadjustments. Bends in mast, wrinkles in sails etc. Does you model's mast rake forward down wind? Is the back stay bending the top of the mast. How are the jumper/jenny stays adjusted do they balance the tensions between the jib and the back stay?
--
The late Manny Costa of RI always stressed, change one thing at a time to see what changes. He also stressed sailing a pair of models. One model being tuned and sailing against the second to see if the single adjustment improved performance.
Round-Robin racing in pairs is an excellent way to evaluate how your model performs.
Place the model in a stand. Head the model into them wind.
Things that can be moved, and adjusted: Mast step. Mast rake. Boom vangs. Shrouds. stays. Jumper stays. Head stay/jib stay. Sail shape - loose foot. out-hauls.
Attach the sails to the mast.
Set the sail winches in fully trimmed position while allowing sheets to be slack.
Stand the mast with standing rigging attached in the center step position.
Hook the jib swivel into the middle slot of the jib rack. {The jib boom needs to clear the mast.}
Connect the side stays to the chain plates and adjust so the mast is straight and vertical.
Connect the back stay to the back stay fitting.
The jib stay and back stay will need adjusting to set the mast in vertical position.
Move the out-haul of the sails along the boom to give the sails to have some "belly". Pulling the sails out along the boom flattens their shape. The belly (or shape) of the sails will be determined later and the sail shape will be determined by how windy it is.
Where you attach the sheets to the booms will take into account the type and adjustments available for the sail control. The booms should be full out (90 degrees to the center line of the hull) when the SCU is full out and then the booms should be just about over the center line when fully trimmed in. ( I see 10 degrees as suggested angle to center line). The length of jib sheet trimmed and the length of main sheet trimmed is a factor in setting up the sail control so the sails are coordinated properly when sailing. The SCU handles a much longer main sheet than the jib sheet. The use of jib traveler and mainsheet traveler can help position the sails when fully trimmed in. Unless two servos (SCU's) are used a single SCU has the task of coordinating the positioning of the jib and main.
Turn on the R/C and run the SCU.
Test out SCU setting with the sails full out and fully trimmed.
With the mast set up and sails adjusted roughly in position it time to launch and sail.
--
Setting Sail on the water.
Before launching TURN on the radio on the boat. I have seen many models set loose to sail with the on board receiver and sail controls not tuned on and very unhappy skippers watching as their model sails away towards the horizon.
The initial rigging and sail settings are based in getting the model to sail a strait line while close hauled (sails trimmed in) and sailing up-wind.
Properly trimmed the rig will allow the model to sail it self in a straight line with just a minor tendency to "round-up" (i.e. sail itself dead into the wind). If or example you find you are constantly pulling the tiller (i.e. rudder) hard over to pull the model back on course to keep from heading in to the wind your model has weather helm which means your mast and jib must be re-positioned. When tacking if your model stall's into the wind and won't tack? Try different rig setting.
--
Setting Sails
The art of tuning the rig on a sail boat is detailed in books written for racing yachts and boats.
"DINGHY SAILS"
by Jeremy. Howard-Williams
"The Best of Sail Trim:
A Selection of Articles from Sail Magazine"
"Sail Trim: Theory And Practice"
by Peter Hahne
My observations and commentary on tuning are from an amateur and are at best suggestions not professional advice.
Observation Number One!!
Model sails that are single panel loose footed sails rely on the shape of the sail established by the gap between the boom and the foot of the sail. Model sails with "shape" sewn into the sail fabric still are loose footed. Also the lift of the boom also factors in determining the shape and performance of the sails.
Hauling a sail into the center line and at the same time pulling down on the sail can flatten the fabric and kill the sail shape. I like to use travelers to position the sail to the desired point near the center line. Then you can set the point of maximum driving force and not wreck the sail shape.
On a big boat the skipper can changer the suit of sails to match the cut of the sail with the wind conditions. In the case of a model a skipper can change where the out-haul is along the boom, light air adding belly to increase the drive, heavy air pulling the sail out further changing the sail's airfoil.
The jib and mainsail work as a system. A skipper has all manner of combinations that may be set relating the two sails. If the models did not have jib clubs they could overlap the mainsail. So model sailors have to adjust the "slot" between the jib and the main to get the maximum driving combined air foil.
In heavy air you may want to close the slot and ease the main so that the jib slightly back-winds the main to help the model sail flatter (less heeling).
Don't forget on a model it is easy to rake the mast fore and aft to trim the sailing characteristics to match wind conditions.
--
A digital camera can be a terrific diagnostic tool for seeing what is happening on your model. You can look at pictures and spot misadjustments. Bends in mast, wrinkles in sails etc. Does you model's mast rake forward down wind? Is the back stay bending the top of the mast. How are the jumper/jenny stays adjusted do they balance the tensions between the jib and the back stay?
--
The late Manny Costa of RI always stressed, change one thing at a time to see what changes. He also stressed sailing a pair of models. One model being tuned and sailing against the second to see if the single adjustment improved performance.
Round-Robin racing in pairs is an excellent way to evaluate how your model performs.
Subscribe to:
Posts (Atom)